I just submitted this to
http://www.ikeahackers.net/ and don't know yet if it will be published there or not. I love Ikea Hackers - they helped me choose the Kura and gave me the idea for this project made from an Ikea Bookshelf. The only problem with submitting a hack to them is that you are only allowed five photos. I don't think five photos is enough - so here is my Ikea "hack" with a lot more photos :)
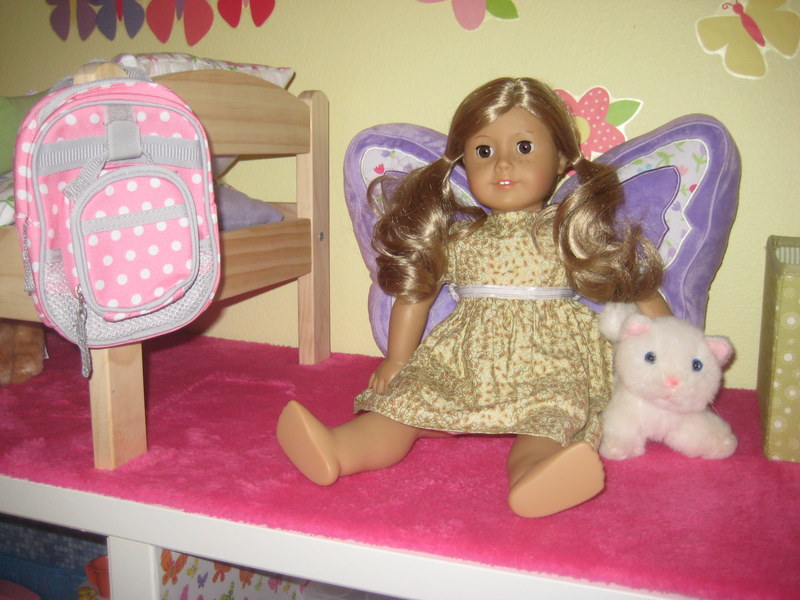
Sitting in the "bedroom" (top of the bookshelf):

Walk in closet:

Bathroom:


Kitchen:

Dining Room:

Garage (with wooden train set stored in the bin):


MATERIALS: Ikea Besta Shelf Unit, two Ikea Inreda Half Shelves, black and white checkered contact paper, self adhesive vinyl tiles (12inx12in from Home Depot - wood look for kitchen and tile look for bathroom), currogated cardboard (Save Besta box!) and ultra plush fabric for carpeted rooms (more plush than fleece), poster board and scrapbook paper
(12inx12in) for walls, doll furniture (See Description for more details), utility knife, straight edge, rubber cement, spray adhesive, mounting squares, mini hooks, storage containers, metal wire saran wrap holder, plastic mirror sheet
This was designed for a small space in a room shared by my 4 year old girl and 2 year old boy. If you have more space or only girls you may want to modify this by adding more Besta units, taking away the garage etc. Please note that the "garage" is not big enough to hold American Girl/Our Generation sized cars. It was designed for my kids' extensive collection of various sized toy cars and trains. Of the five "rooms" (four inside, fifth on the top) in the doll house section three (including the top) hold a standing 18 inch doll, and two only hold the dolls in a sitting position. Getting rid of the garage level would allow for the dolls to stand in all of the rooms.
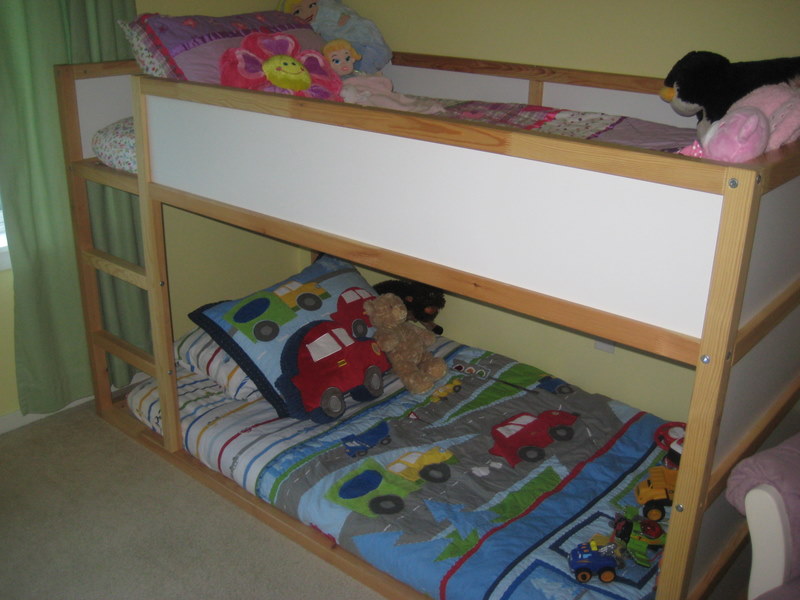
My kids sleep in a Kura bed right next to the house, which allows my daughter (who sleeps on the top bunk) to put her dollies to bed every night right from her bed without needing a stool. I chose the Besta because of the depth and adjustabity of the shelves. My husband and I are not handy enough to construct something ourselves out of plywood, and nothing exists in the market (unless you pay someone on etsy big bucks to make it for you) to play house with large sized dolls.
View from my daughter's bed:

I considered the Expedit as it is also deep enough, but it would have required the addition of a plywood piece to the back and more holes to change shelf positions. If you are handy and have an Expedit it would probably work. Lots more Expedits on Craigslist than Bestas.
STEP 1: Garage floor. Cover the entire Bottom piece of the Besta unit with checkered contact paper as well as one of the Inreda shelves. Cut small x's into the four holes necessary for attaching the side pieces. Do not cut the holes intended for leveling the feet. Cut along the line where the back panel will slide in. I trimmed my contact paper first so that the squares on the front edge where whole sqaures instead of partial squares.

STEP 2: Bathroom and kitchen floors. Using two of the full sized shelves, measure and cut your vinyl tiles with a utility knife so that you are happy with the way the patterns line up. My kitchen floor tiles were very easy. The bathroom tiles I chose had to be cut quite extensively so that I was happy with how the pattern came together. I had to cut around some of the small squares to piece them together. The result is slightly messy but looks better from far away.

 STEP 3: Carpeting. Cut out three pieces of corrugated cardboard. The box the Besta came in is perfect. One piece should fit the entire top of the unit, and the two smaller pieces should fit the shelves. No need to measure, just place the shelves on top of the cardboard, kneel to hold it in place, and cut out the shape with a knife. Cut out three pieces of the plush fabric sho that they are a few inches wider than the cardboard on all sides. Lay the cardboard on top and cut off the corners. Lay a tarp outside and attach the cardboard to the fabric with the spray adhesive. spray the back side to fold over and attach the remaining fabric. I didn't bother gluing the finsihed pieces to the shelves.


 STEP 4: Assemble the unit/anchor to wall. The unit needs to be assembled at this point using the directions from Ikea. I used props to help me figure out where to put the shelves. I used a Kusiner box from Ikea for my son’s wooden train track/train collection and placed it to decide where to put the first shelf. I then stood the American Girl doll up in the "kitchen" to decide where to place the next shelf, and I sat her at her table and chairs to find the minimum height for the dining area. The Inreda shelves in the garage and closet are both three or four holes down from the top. You will have two extra unused shelves when you are done. I did not use the permanent hardware included for use with the middle shelves, only the moveable ones.
STEP 5: Wallpaper. Measure and cut three pieces of poster board for each of the doll house rooms (One for the back wall and two for the side walls). Lay them out next to each other and figure out how to piece together your scrapbook paper. Glue the paper over the crack between the pieces of poster board and then fold so that you don't have gaps in your wallpaper at the corners of your rooms. Piecing together 12x12 pieces of patterned scrapbook paper can acutally be quite frustrating when trying to get the patterns to line up. I would recommend placing any seams towards the bottom half of the wall. You might also want to consider real wallpaper scraps or wrapping paper. Make sure you remove the carpet pieces before measuring for or place the wallpaper. I tried mounting the wallpaper with a glue gun and it didn't work (too shiny) so I ended up using mounting squares. Not sure if I like them because they are thick and make the walls stick out slightly where the mounting squares are placed. You may want to mount the finished poster board another way.


****Tricky walk in closet: When measuring the poster board for the walk in closet stick a small finishing nail in the holes where you want your Inreda shelf. Push the poster board onto each nail until you get a small impression and then pop the actual hardware through the hole. After you glue on the scrapbook paper pop the hardware through again.

After the wallpaper is mounted in all of the rooms, the walk in closet can be finished by installing the plain white inreda shelf and jamming the saran wrap holder (I ordered one on Amazon) in sideways. The front rack can be bent up to keep dresses from hitting the floor and the cute hangers are from Ebay. The drawers are Sterilite from Target.
STEP 6: Furnish. This was the trickiest part, as this is a fairly small house for such a big doll. Some American Girl furniture may not fit well in the house. I will tell you everything I chose here: The bed is an Ikea Duktig bed. The bedding is sewn from leftover carpet material from the house, my daughter’s old baby blankets and onesies, and some scraps from the bag her sheets came in from Target (so they match hers). The pillow and sheets are reversible :)


The table and chairs are Pottery Barn Kids, the Kitchen and Bathtub are Our Generation from Target, and the batroom toilet and sink are a retired item from Ebay - a "Mommy Gotta Go Doll" (comes with a baby doll that is potty training - shown in photo) The mini hooks are 3M with the adhesive trimmed or turned around, the mirror sheet is from a craft store, and the mini storage tubs are Ikea GlIS boxes with lids.
I didn't adhere any furniture to the house. This was all meant to be taken out and played with on the floor if the mood strikes, or played with in the house. My kids have been playing "picnic":

The cute little tires and hubcaps hanging in the garage are Ridemakerz from Toys R Us. The play rug is from Rugs USA (online).
Future plans to add more detail: Baseboards (red electrical tape in the garage and white foam sheets in the house part), little picture frames, clocks, etc.
This is my first online DIY post because I couldn't have done it without the tons of posts I sifted through for inspiration - so thanks to all of you!
Jessica